Understanding Synths, part two
Welcome back!
If you read the first article on music production, you’ve learned about 3xOsc, a small but mighty synthesizer. If you haven’t read about that, I suggest you do here, lest this article disorient you further.
Note: If you don’t have Fruity Loops Studio, you won’t have 3xOsc, and this article will destroy you. To ease confusion, you can download the demo of FL Studio at this place. Mac users, I’m sorry: This program is exclusive to Windows!
This guide will detail one more function in 3xOsc, then explain some functions of effects one can apply to 3xOsc when routed to a mixer.
Let’s go, again!
The Arpeggiator
The first function I’ll explain is 3xOsc’s Arpeggiator. If it’s activated, it will alter the placement of a single note, shifting between the original note and variations of its octave. A C5 might “flutter”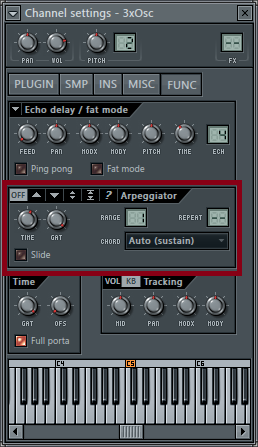 between a C4, C5, and C6, and entire chords will oscillate between however many notes compile it. One can locate it on the FUNC (function) tab in 3xOsc, in its center. 3xOsc’s arpeggiational machine bears three main sections:
- The range of the arpeggiation, represented in the number in the mock-screen by RANGE.
- The direction of the arpeggiation, in the black bar near the ceiling.
- The time of the arpeggiation, and the degree of its gate effect, found in the two knobs labeled TIME and GAT.
The range constitutes most of the arpeggiation. If the range is at 1, like in the photo, a C5 will arpeggiate to… a C5. There’s no range. A range of 2 will allow a C5 to “arp” up to a C6 or down to a C4. Of course, that depends on the arp’s direction, which the black arrows at the top of the Arpeggiator decide.
The first direction is upward, the second is downward, the third bounces up and down while the fourth jolts up and down, and the fifth generates a random direction of arpeggiation.
The TIME slider can adjust the individual notes of the arpeggiation to sync with time signatures in formats like 0:04, 0:12, or 0:16. A time signature of 4/4, whose basis is 4, to require formats of 0:04 or 0:16 for syncopated, in-rhythm arpeggiations—and they are right. A single note played to an arpeggiation of 0:04, 0:08 or 0:16 will keep tempo with whatever the tempo is. However, a typical chord will not; common chords consist of three separate notes, not one. So, if the range is set to 2, in an upward direction, at a C5 chord (which holds the notes C5, E5, and G5), the arpeggiator will play C5, E5, G5, C6, E6, G6, a total of six notes. In the time signature of 4/4, six notes will create triplets, in-tempo but not totally synced to every count.
I’ll give you an audial example of that to quill any confusion soon, promise! There’s only one more thing: the GAT knob.
Ready?
It adds a variable gate effect.
If you don’t know what that is, and missed how anticlimactic that was, let me explain. A gate effect is how your hand sounds when dragged across a physical gate: the empty slots between the poles stop the sound of fleshy impacts. Likewise, an electronic gate will stop the sound of the arpeggiation, allotting nothingness instead.
Okay, here are the examples!
https://soundcloud.com/glassandrubber/threetriple
Make sense? Good, you’re done!
…With that. Now let’s travel to the land of effects and mixers.
Mixers and effects
If you’re using 3xOsc, you’re using Fruity Loops Studio as your workstation, which is useful. Press the F9 key to open FL’s mixer. You should see something monstrous like this: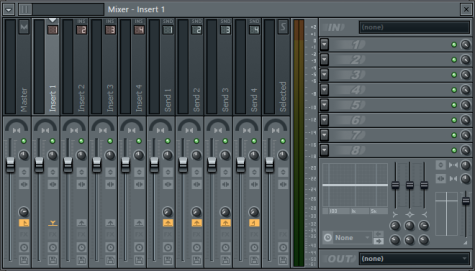
Don’t flee, yet! The mixer is easier than it looks. Everything’s a pattern!
“Insert 1” is selected and highlighted. If it’s not, click it. You’ll notice nothing will change, except the color of Insert 1. The vertical red box below Insert 1 signifies the location of its volume slider, stereo separation knob, panning slider, and some other sophisticated stuff I’ll not get into. I won’t discuss these much, but that’s what they do. It’s not so scary!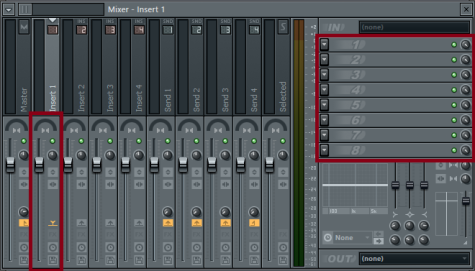
The effects’ channels are located in the right box. This is a little scary. To link effects to 3xOsc, we must link 3xOsc to the mixer. With Insert 1 selected, press ctrl+L to link 3xOsc to the mixer. It should look like this now: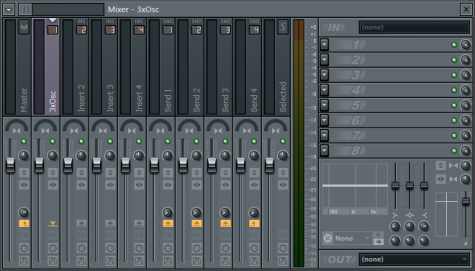
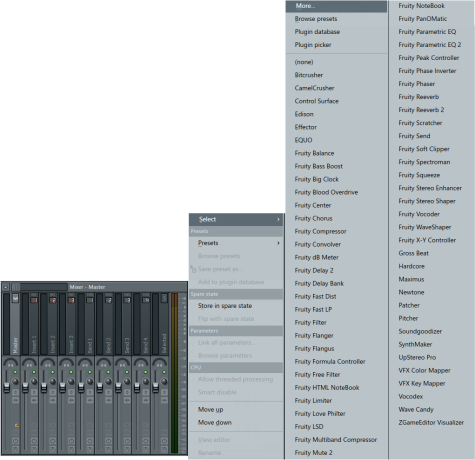
Now 3xOsc will receive any effects inserted into effects’ channels. Upon clicking the downward-arrowing button by the 1, this should greet you:
The simplest of effects is reverb, so let’s begin with that. See “Fruity Reeverb 2” on the far right? Click that! Reverb, or reverberation, mimics the echo-like sound that encompasses noises in a large room. And Fruity Loops’ reverb is great, as it provides a physical diagram of what your reverb looks like. I won’t illustrate every aspect of this tool, but explain the mainframe of it. Explore!
Reverb has many important functions, but the most noticeable are decay, dry, wet, and size.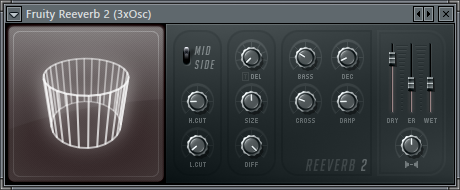
- The SIZE tab modifies size, as one could’ve guessed. This will create the effect of a larger or smaller “room.” As the room shrinks, the reverberation turns into more of an echo, and as the room enlarges, it fades into the well-known whispery reverb.
- Dry and Wet exist as sliders on Fruity Reeverb’s right side. DRY is the pure sound of the instrument to which the reverb is paired, in this case our 3xOsc. There’s no reverberative effect in DRY. WET is the inverse—only the sound of the reverberation. If the DRY slider is moved down into muteness, the instrument would produce only the sound of its reverberation.
- Decay, on the DEC knob, modifies the reverb’s time of decay in the same way 3xOsc’s Decay envelope does: longer decays mean a longer duration of the sound is active.
Here’s what altering types of reverb sound like on 3xOsc.
https://soundcloud.com/glassandrubber/3xosc-and-fls-reverberation
The Last Step (Before we actually begin, again)
You know how to insert an instrument into Fruity Loops Studio’s mixer, and pair reverb with it. Other effects work similarly with pairing and altering: Try adding other effects and deciphering what their knobs and sliders reconfigure!


